# 第一个页面

本节,我们来实现这个简单的页面。 开始前,请确保Vue官方教程的基础部分 (opens new window)你大致理解了。
# 静态页面的实现
这个页面大致分为头、身、脚三个部分(未圈起来的部分以后实现),结构简单,没啥好说的(毕竟这是个认真的“切图仔”提升教程)。先贴上咱们的骨架代码:
<!-- todo-list-client/src/App.vue -->
<template>
  <section id="app">
    <header class="header">
      <h1 class="header__title">我的任务</h1>
      <div class="header__body">完成2个 共7个</div>
    </header>
    <main class="main">
      <ul class="l-list">
        <li class="l-list__item">
          <div class="c-checkbox">
            <input type="checkbox" class="c-checkbox__input"/>
            <label class="c-checkbox__label">第1个任务</label>
          </div>
        </li>
        <li class="l-list__item is-completed">
          <div class="c-checkbox">
            <label class="c-checkbox__label is-completed">第2个任务</label>
          </div>
          <div class="l-list__text">2020/03/31</div>
        </li>
      </ul>
    </main>
    <footer>
      <button class="c-button">新增</button>
    </footer>
  </section>
</template>
2
3
4
5
6
7
8
9
10
11
12
13
14
15
16
17
18
19
20
21
22
23
24
25
26
27
28
/* todo-list-client/src/App.vue */
<style>
#app {
  min-width: 375px;
  font-family: 'Avenir', Helvetica, Arial, sans-serif;
  -webkit-font-smoothing: antialiased;
  -moz-osx-font-smoothing: grayscale;
}
.header {
  position: relative;
  margin: 90px 0 0 70px;
  padding: 30px 0;
}
.header__title {
  color: #2c2c2c;
}
.header__body {
  color: #b9b9b9;
}
.header::after {
  content: ' ';
  position: absolute;
  left: 0;
  bottom: 0;
  width: 100%;
  height: 1px;
  background: #eeeeee;
  transform: scaleY(0.5);
}
.main {
  margin-top: 30px;
}
.l-list {
  padding-inline-start: 0;
  list-style-type: none;
}
.l-list__item {
  padding: 10px 0 10px 30px;
}
.l-list__item.is-completed {
  background: linear-gradient(to right, #F2F2F6, rgba(0,0,0,0));
}
.l-list__text {
  margin: 10px 0 0 40px;
  color: #c5c5c5;
}
.c-checkbox__label {
  margin-left: 27px;
}
.c-checkbox__label.is-completed {
  margin-left: 40px;
  color: #e02f2f;
  text-decoration: line-through;
}
.c-button {
  position: fixed;
  bottom: 35px;
  right: 30px;
  width: 54px;
  height: 54px;
  border: none;
  background: #E03535;
  padding: 0;
  border-radius: 4px;
  color: white;
}
</style>
2
3
4
5
6
7
8
9
10
11
12
13
14
15
16
17
18
19
20
21
22
23
24
25
26
27
28
29
30
31
32
33
34
35
36
37
38
39
40
41
42
43
44
45
46
47
48
49
50
51
52
53
54
55
56
57
58
59
60
61
62
63
64
65
66
67
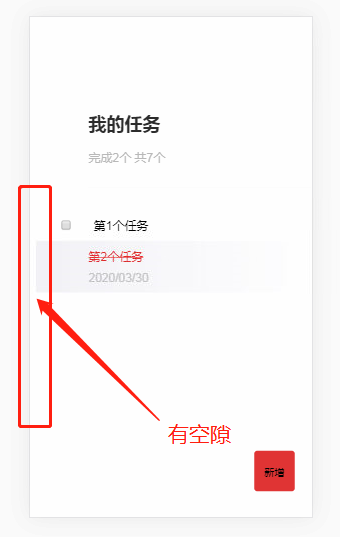
这里,暂时采用移动端优先的设计,以iPhone6的尺寸为基准(移动端适配、自适应、响应式啥的先别急哈)。
保存后,我们会看到咱们的页面也有了相应的变化。
# 跨浏览器样式兼容
但是如果我们仔细瞅瞅,会发现看上去好像和我们期望的样子有些许差距???
通过浏览器的开发者工具中的Elements选项卡,我们可以发现,chrome浏览器对<body>标签添加了默认的样式:
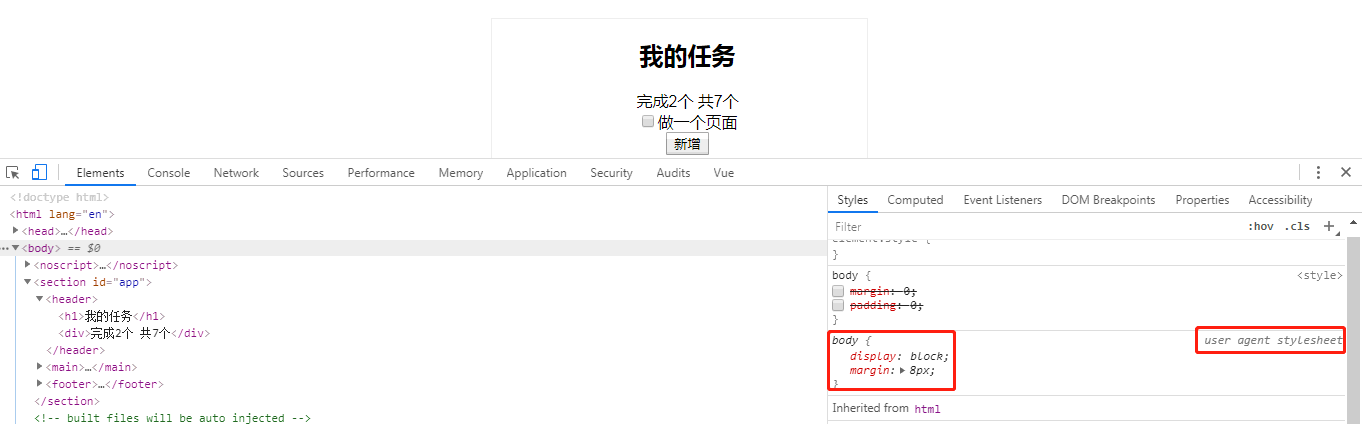 因而,我们需要设置全局的css样式,覆盖它。
常规做法是我们自己针对<body>标签写样式覆盖它:
body {
  margin: 0;
}
2
3
但是,浏览器其实对不少元素定义了默认的样式,并且不同的浏览器对于同一元素的默认样式有时还会有差别,自己手写覆盖的样式的方式变得不可控制。
好在,此类工作已有前人完成: normalize.css (opens new window)
Normalize.css makes browsers render all elements more consistently and in line with modern standards. It precisely targets only the styles that need normalizing.
我们来引入它,在终端中输入:
npm install --save normalize.css
安装完成后,在main.js中引入,使之成为全局样式
// todo-list-client/src/main.js
import Vue from 'vue'
import App from './App.vue'
import 'normalize.css/normalize.css' // a modern alternative to CSS resets

Vue.config.productionTip = false

new Vue({
  render: h => h(App),
}).$mount('#app')
2
3
4
5
6
7
8
9
10
保存后,在浏览器中你会发现,浏览器的部分默认样式已经成功覆盖了。
# Vue数据驱动初体验
这部分我们给页面加点功能,体验下Vue的数据驱动:
- 在js里手动造一些任务项的数据
- 点击复选框表示完成待办项,并记录完成的日期
- 已完成事项隐藏复选框,展示完成的日期
- 未完成事项转变为已完成时,样式要改变,并更新页面头部的统计数据
此处,几乎Vue官方教程的基础部分 (opens new window)中的所有知识点都涉及了(除了组件基础)
// todo-list-client/src/App.vue
<template>
  <div>
    <header class="header">
      <h1 class="header__title">我的任务</h1>
      <div class="header__body">完成{{ completedTodos.length  }}个 共{{ todos.length }}个</div>
    </header>
    <main class="main">
      <ul class="l-list">
        <li
          v-for="(todo, index) in todos"
          :key="todo.id"
          :class="['l-list__item', { 'is-completed': todo.completed }]">
          <div class="c-checkbox">
            <input
              v-if="!todo.completed"
              v-model="todo.completed"
              type="checkbox"
              class="c-checkbox__input"
              @click="finish(index)">
            <label :class="['c-checkbox__label', { 'is-completed': todo.completed }]">{{ todo.content }}</label>
          </div>
          <div
            v-if="todo.completed"
            class="l-list__text">
            {{ todo.completedDate }}
          </div>
        </li>
      </ul>
    </main>
    <footer>
      <button class="c-button">新增</button>
    </footer>
  </section>
</template>
<script>
export default {
  name: 'App',
  data() {
    return {
      todos: [
        {
          id: 1,
          content: '第1个任务',
          completed: false,
          completedDate: ''
        },
        {
          id: 2,
          content: '第2个任务',
          completed: true,
          completedDate: '2020/03/30'
        },
        {
          id: 3,
          content: '第3个任务',
          completed: false,
          completedDate: ''
        },
        {
          id: 4,
          content: '第4个任务',
          completed: true,
          completedDate: '2020/03/31'
        },
        {
          id: 5,
          content: '第5个任务',
          completed: false,
          completedDate: ''
        },
        {
          id: 6,
          content: '第6个任务',
          completed: false,
          completedDate: ''
        },
        {
          id: 7,
          content: '第7个任务',
          completed: false,
          completedDate: ''
        },
      ]
    }
  },
  computed: {
    completedTodos() {
      return this.todos.filter( item => item.completed === true )
    }
  },
  methods: {
    finish(index) {
      this.todos[index].completed = true
      this.todos[index].completedDate = new Date().toLocaleDateString()
    }
  }
}
</script>
// ...
2
3
4
5
6
7
8
9
10
11
12
13
14
15
16
17
18
19
20
21
22
23
24
25
26
27
28
29
30
31
32
33
34
35
36
37
38
39
40
41
42
43
44
45
46
47
48
49
50
51
52
53
54
55
56
57
58
59
60
61
62
63
64
65
66
67
68
69
70
71
72
73
74
75
76
77
78
79
80
81
82
83
84
85
86
87
88
89
90
91
92
93
94
95
96
97
98
99
100
保存后可以在页面上试试这些功能,结合Vue 的文档理解一下,毕竟它的文档真的写的很清晰详细。
# 课后拓展
本教程中的 css 会继续采用本节中使用的 NameSpace + BEM 方法撰写:
BEM — Block Element Modifier is a methodology that helps you to create reusable components and code sharing in front-end development
目前市面上常见的 UI 框架的 css 都采用了类似的写法。
如果你有兴趣的话,推荐以下步骤了解(当然不想了解的话,不会影响对本教程后续的学习):
- 先通过getbem (opens new window)了解bem的精髓
- 再尝试自己写一写,实现本节的静态页面
- 如果你感觉有点无从下手或者还不是很清楚如何去写,再试试看这篇文章,总结了10个常见场景及相应解决办法(里面还推荐了一些相关文章,都能帮助你理解): Battling BEM CSS: 10 Common Problems And How To Avoid Them (opens new window)